It is unpleasant when we take our bike to a nearby repair station for little things such as adjusting brakes or lubing the bike chains. Maintenance is hard without special tools like hex screwdrivers and bike chain removal tool unless you have a degree in the field of bike repair. Have you ever needed to remove a bike chain without tool? Seems quite a professional task… Does it? Let’s figure this out!
What You Will Need
Removing the chain link without a chain breaker tool may not be easy, so, get ready for some careful physical exercise. And don’t forget the things listed below. They will replace the bike chain removal tool.
1. A hammer
2. A thin steel cylinder that can fit inside the hole of the chainplate, hard enough to press out the chain pin: nail, screwdriver hex mouthpiece, etc. An essential tool.
3. Something hard enough to withstand a hammer blow to let the pin come out, like a nut or piece of wood with a small hole.
4. Regular pliers (Better – needle nose pliers)
5. Shoelace
6. Flathead Screwdriver
Step-by-Step Instruction
Make sure you lock the chain link securely after installation. We don’t recommend disconnecting and connecting the bicycle chain this way. Please, follow the advice only if you don’t have a chain breaker tool, which you can always buy online. Be careful with operations on the chain even with a chain tool.
Before moving to the manipulations with the hammer, bicycle chain links, and nut, know that removing the chain without a chain tool is not always so difficult.
In fact, some chain manufacturers add a master link that makes it easy to open and close the chain. All you need in this case is fingers and the master link.
If you want a chain with a master link, you can buy it in a nearby bicycle store. We recommend chains by ZONKIE. Do not worry, thanks to its special shape and technology, the master link will not open during your ride.
Finding the Master Link

Let’s begin. Follow the steps below to find your master link and start bike chain removal.
Step 1
Go along the entire chain and find a link different in color, or a link with a specific shape of the hole that reminds a keyhole. Such master links are called SRAM-type chain links. Alternatively, master links can have a shape of U or C (open at one end), called C-style master links.
Step 2
Put your bike upside down so it lies firmly on the ground. This will give you the necessary stability to work on your bike chain easily. Rotate the pedals to easily access the master link with your fingers. If you can’t find the link but you know it is there, clean your chain.
Step 3
Reduce the tension in the chain. To disconnect the master link, you need to hold the chain in your arms as if you hold a regular string. To do this, change the gearing of your bicycle: make sure that the bike chain bends the smallest gear of the chainset and the smallest gear of the cassette.
As you found your master link, look at it. We need to identify the type of link to open it.
Identifying the Type of Master Link
If both chainplates are closed at either end and there are only two chainplates in the link, most likely, you have an SRAM-style master link. Such a link consists of two identical pieces: a pin is firmly mounted inside the hole of one chainplate. New chain pliers may help.
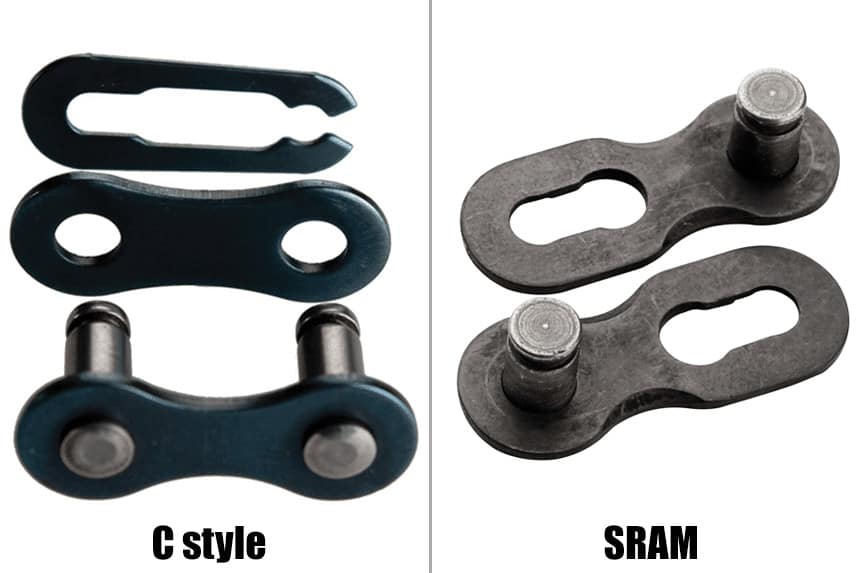
If your master link consists of three pieces, this is a C-style master link. Both pins are mounted onto one chainplate. The other chainplate prevents the link from stretching. The securing plate prevents the chainplates from opening.
Step 4
For an SRAM-style master link, draw the pins closer to each other toward the wider opening. Slide the chainplates with fingers to bring the pins closer. If this doesn’t work, or the link can’t open because it’s rusty, insert two thin nails outside the pins and approach them with pliers.
Alternatively, you can insert a shoelace between the chainplates of the links neighboring the master link to embrace them. This will act like master link pliers.
Pull the ends of the shoelace in the opposite direction as hard as you can trying to bring the pins closer. Your goal here is to move the link and bring the free end of the pin closer to the wider section of the keyhole opening.
For a C-style master link, detach the C-style cramp plate with the flathead screwdriver.
But I Don’t Have a Master Link
If all links look the same, and you are sure you can’t find the master link, congratulations! This is where you need the nail, nut, and hammer. Of course, you can order the chain breaker tool and eject the pin easily, but if you don’t want to wait, follow the steps below. This task will not be easy, put on the safety gloves.
Step 5
Put your bike horizontally to let the bike chain touch the ground. Make sure that the bike doesn’t move and it will not move while you make the manipulations.
Step 6
Select a link from which you will press out the pin. put a nut or something rigid with a hole inside (to let the pin fall off) on the ground. Place the chainplate on top of the nut.
Step 7
On top of the link, on the side of the opposite chainplate, put a nail or something thin in the hole of the chainplate, just above the pin. Hit the nail with the hammer applying all of your confidence. The pin must fall off inside the nut.
Important comment: while leaving the bike chainplate, the pin deforms the hole. So, there is no guarantee that after you assemble the chain with the same pin, it will lock securely. The diameter of the hole has been increased by the pin, a loose connection is a frequent problem.
Step 8
To assemble the chain link, follow the procedure in the backward order. For the SRAM-type, assemble the link and pull the chain to draw the pins apart. A chain tool will make it easier.
For the C-type bike chain link, connect the two chainplates, and you will see that the pins protrude enough to be secured with the C-cramp. Attach the cramp and lock the chain.
For a regular bicycle chains, buy a master chain pin. It is a thicker pin with a tapered end. Insert the master pin inside the old chainplate. If this does not help, press it with pliers.
FAQ on How to Remove a Bike Chain Without Tool
- Is it possible to shorten a bike chain without a master link?
Yes, but you will need to follow steps 5 to 8 to the chain link you want to remove add to the new link connected to the master one.
2. What chain tools should I buy to change a bike chain?
You need to buy a chain breaker tool or master link pliers depending on the type of your chain. Ask for a chain tool in a local bike shop.
3. Do bike manufacturers install a chain with a master link on all bikes?
Unfortunately, no, but you can always replace a regular bike chain with the chain equipped with the master chain link. Use the appropriate chain tool.
4. How often should I change my bicycle chain?
There is no exact range or timelines because it all depends on the conditions in which you are riding: your style and manner, weather, quality of the chain and lube, temperature, and other factors.
Some specialists advise that it is good when you change your chain every 2000 miles or 3000 km. The more important thing is that you should change your chain when it is damaged.
Conclusion
So, that was probably the first time you removed a bike chain without a chain breaker tool! Even when you think you have done everything correctly, test your chain before yet another ride.
Put your bike upside down or hang it on a repair stand and rotate the pedals. Try to shift gears up and down. Make sure that the chain doesn’t emit any suspicious sounds.
Rotate the pedals long enough to see if the chain doesn’t get stuck in the bike drivetrain. Lubricate the bike chain if you see that some lube has gone during the manipulation.
If you see that the new chain goes properly, take your bike for a short ride. Change gears and apply enough effort to test the chain, then ride in your usual manner.
What do you do if you get bicycle grease on your clothes? Read about it in this article.
Do you see that everything is perfect? Congratulations on a new skill acquired! Have a nice ride!