If you’ve spent a significant amount for an expensive Peloton Bike or Bike+, but it isn’t turning on, don’t get worried. You start looking for “Peloton Not Turning On” There are a few simple steps to take to restore power so that you can return to riding!
If your Peloton doesn’t start the bike, it’s due to loose connections that need to be replaced. While your bike is plugged into the power brick, make sure you check the connections on the brick that powers your Peloton bike, on the bottom of the bicycle, then up to the resistance mechanism, and then at the side of the LCD.
The connections are reported to break as time passes, but they’re easy to reconnect when you know where to search.
Let us start!
Connections to see if your Peloton isn’t turning on
If you are experiencing issues powering on your Peloton Bike+, this may result from a loose or incorrect connection. Here are the connections you should verify in the correct order. Lots of people who end up with the problem of their Peloton bike screen not turning on end up having a power cord issue, too.
Note that the Bike or Bike+ have the exact connections, but with a few minor differences, which we will explain in the following.
Power brick and power plug
The first thing to do is We know it’s simple, but ensure that the Peloton’s power source is connected correctly.
Also, you need to take note of two connections at the back of the Peloton bike display screen. The connection to the right and left represent the Peloton bike power supply and audio connection, respectively. So, if the power supply connection from the power adapter is not firmly connected, the Peloton bike won’t work or turn. So, it would help if you made sure that the power cable or connection is secure and firmly connected. However, the Peloton bike plus connection is a bit different.
This is a reference to:
- The cord for the power cord is connected to the wall
- The cord is connected to the brick that powers the power.
The first one is easy enough, but ensure that you’re connected to an electrical outlet that works! If you’re unsure, you can try connecting an alternative device to the same outlet.
If the device comes on, the outlet is functional and can continue.
The second thing people tend to overlook quite frequently. The power supply cable is connected to an energy brick, and the power supply cord could be cut off from it, effectively destroying the Peloton bike’s power source.
If the cable isn’t securely seated or snug, it is likely that your Peloton will not turn on.
If it’s connected properly, there should be a faint blue light in the brick!
The power adapter is at the base of the Peloton bike.
The following location is the back where the bike’s base is. This is where the power supply cable connects through an adapter to it.
If the adapter isn’t properly connected and firmly connected, your Peloton will not start. We would remove the adapter and then connect it back to ensure that all is in place.
If you own an adapter called Bike+ adapter, it has a white light that will turn on if it’s properly connected. The Peloton Bike version doesn’t come with this white light, so you’ll have to guess it’s working once you’ve connected it.
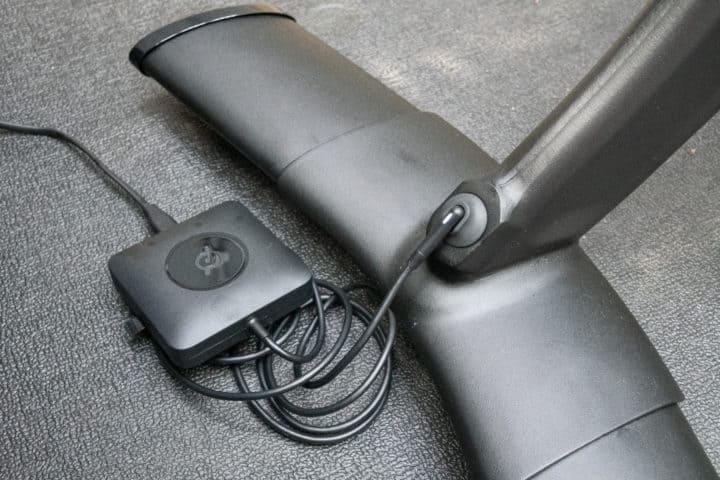
Connectivity is established with the resistance mechanism.
Now is the time to check under the resistance mechanism to verify that the power line is safe.
This is by far one of the most complex connections to detect and connect and reconnect, so be patient when you are doing this. If you have children with small hands, They could be helpful during this process!
We would suggest that you take a flashlight or your smartphone’s flashlight to locate the resistance mechanism in the first place and then orient yourself.
The bike has two connectors on the left. Bike+ comes with a single UBC-C connection on the right-hand side on the right side. There are two ports here; your UBC-C cord should be connected to the top connection port.
It’s more typical that this connection comes out of the Bike+ because the cable isn’t properly secured. In Bike models, the cable is secured. Peloton Bike model, both connections have a cover and are secured.
In any event, ensure that the wires are in good working order before going on.
The back of the display panel
You’ll be glad to know the following power connection is much easier to access.
Behind the touch display panel on your Bike, You should be able to see wires that connect to your back. Double-check that the wires aren’t coming unattached.
Sometimes, children can tug on the wires and shake them around. If the wires aren’t connected, the display of your Peloton will not be lit.
If you’re facing the rear of the Peloton bike’s display, the audio must be wired to the left, and the power supply should be connected to the right.
The audio cable should be connected to the top port for bikes and owners, and the USB-C power cable must be connected to the middle port.
Over the shroud of brakes (Bike+ only)
If you have one of the Bike+, you’ll need an additional connection to test.
The connection can be just to the bike’s left, approximately similar height to the mechanism for resistance, which is located just below the brake shroud.
Another UBC-C connection can sometimes fail.
Two ports are available in this case; your UBC-C cord is required to be connected to the highest connection port.
How do I switch on the Peloton screen?
If you’ve examined all of the connections above and verified, they’re secure and that you’re using an electrical outlet that functions now, let’s turn the bike on!
On the side of the display, there is on the back of the display is a grey power button situated in the top middle of the display.
It is necessary to press and hold the button for around 5 minutes. After five seconds, you will see the screen illuminate and load!
You’re back to work.
Peloton Support
But, if it won’t still turn on after checking all the necessary connections, then your last resort before going to a mechanical shop should be to contact the Peloton customer service for help. If your screen won’t turn, and you’re sure all is in order, you should reach out to Peloton directly.
There are several choices for you to choose from. The first is to send them an email at [email protected].
Another alternative is to contact them toll-free at (866)-679-9129. The Peloton team is open seven days between 9 AM and 9 PM ET.
Based on my experience, Peloton customer support is extremely helpful. I’m confident they’ll help you sort out your issues for you.
Peloton Warranty
It’s hoped that it won’t be like this, but if it happens, Peloton Bikes and the Bikeplus are all covered by a Limited warranty for home use.
It is also possible to purchase an extended warranty (which we would always suggest for the price of such a product).
Its Limited Home Warranty includes coverage up to 12 months on things like touchscreens and other components and pedals. The frame of the Peloton bike is covered for five years!
You can read the warranty information here.
Factory Reset
If the screen is not functioning, the final alternative is a factory reset. This will erase all data saved from the Peloton, and you’ll have to do it all over again.
Following the factory reset, your Peloton bike will remain in its original settings like you purchased it in the past.
This is a step-by-step procedure for how to reset the factory Peloton.
- The first step is to turn off the motorbike by selecting to shut it down.
- If the screen isn’t working, take out all plugs and shut off your power source.
- Connect your Peloton bike to the power source.
- The screen will be turned on to boot by holding the volume buttons and the power button till the display is on.
- Use the volume button to select the option of “recovery” from a menu of choices.
- The screen will dim, and the machine’s logo may appear for a short time.
- Again, hit the volume button and then the power button for about 30 hours.
- Several choices will be displayed. If there’s nothing visible on the touchscreen, try it again.
- Press the volume button and select the option of factory reset.
- Click on the power button to continue processing.
- A confirmation pop-up will show on the screen. Select yes using the button to increase the volume.
- Follow up by pressing the power button.
- Within a couple of seconds, your bike will be set to default.
- Click on the option to restart the system.
- Create a new account and sign in.
- Additionally, you can make additional changes.
Make sure to check Peloton Bike Storage Temperature – Everything you need to be aware of there is no reason to be apprehensive about why the peloton screen is not working and what to do about it.
Peloton Not Turning On. Conclusion
A Peloton’s most frequent reason for not switching on is an unreliable or insecure connection.
To correct this issue, For a solution, you should check these:
- Check that the electrical outlet that you’re connecting to functions.
- Make sure you’re connected and that you’ve connected the power brick
- Make sure you have the power adapter in place on the bottom of the Peloton bike.
- Check the resistance mechanism, and make sure that all wires are connected.
- Verify that connections on the rear of the display panel are secure.
- Bike owners and riders have an additional connection to examine the brake shroud.
If you’re sure everything is functioning correctly, Make sure you press on and hold the power switch located on the rear of the display for 5 minutes. The screen should then turn on.
If you’ve completed all of these steps but are experiencing issues with your Peloton being turned on, it’s time to call support.
As a last resort, you could look up your bike’s warranty to determine what warranty you’re covered by. We hope you find this helpful. Are you able to turn your Peloton to turn back on? Tell me in the comments below how it did to get it back on!